You can’t get much more of a discrepancy in sensor sizes in the interchangeable lens camera world than 44x33mm medium format (MF) and 17x13mm micro four thirds (m43), with MF being nearly 3x larger in both dimensions. But what visible difference does this mean for printing on the largest desktop printer?
In this article I make and compare 21″x15″ prints from medium format and m4/3, looking for clear visible differences. Read on to see how I got on.
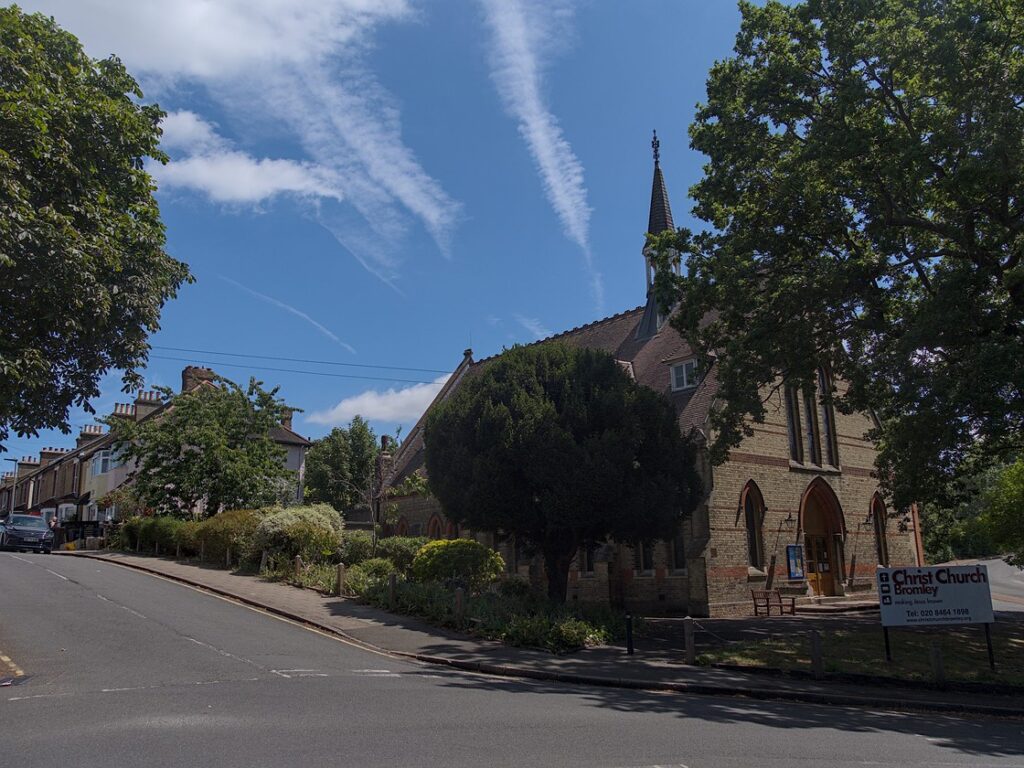
I shot images of a local church in my street using my Fuji GFX50s medium format camera and my Panasonic Lumix G9 micro-four thirds camera. All shots were taken from a solid tripod, used a 2 secs delay, were manually focused using magnification and peaking, carefully pixel peeped for sharpness and edited to look as similar as I could make them using my raw convertor/editor of choice darktable (ver 5.3) and printed at the maximum A2 size my Epson P900 desktop printer supports. I included 40MP and 80MP pixel shift images in the comparison
Setup details:
- GFX50s with 35-70mm @35mm and f/11
- Lumix G9 with 14-140mm @14mm and f/5.6 20MP native file
- Lumix G9 with 14-140mm @14mm and f/5.6 40MP jpg pixel shift file
- Lumix G9 with 14-140mm @14mm and f/5.6 80MP raw pixel shift file
Printer: Epson P900 with standard K3 Epson ink set
Paper: Permajet Matt Plus 240 A2 size, actual printed area: 21″ x 15″
The end result was 4x 21″ x 15″ inkjet prints ready for image quality evaluation.
Evaluation conditions
Prints were examined from about 6″ viewing distance in bright diffused south facing light through a frosted glass bathroom window on a sunny day.
Impressions
So how did the two cameras perform?
Overall look:
- The visual ‘look’ of the prints is similar. There are no obvious tell-tales they were shot with different formats: grain and tones are essentially indistinguishable.
- Resolution and detail of all four prints looks extremely similar across entire frame right to the edges – even though I used a 10x superzoom for the G9. At 14mm and f/5.6, the lens is sharp.
“Crispness” is a different matter (how crisply is the detail rendered):
- G9 40MP pixel shift jpeg: This clearly has the highest degree of crispness. I believe this is because the camera applied in-camera sharpening to the jpeg, and my standard editing workflow added additional sharpening. The result is the 40MP print has a standout amount of punch and clarity. However, and this is a taste thing, too much crunch for my liking. It looks a little false or unnatural in some areas of the image, even though brickwork looks nice and crisp.
- GFX50 print: This is the next most crisp. Detail is nicely rendered across the frame. Mostly, this looks about the right amount of sharpening to me, crisp without being excessive. The weakest area is the telephone lines crossing the frame. They have a kind of zig-zag look, rather than a single line. Possibly the result of luminance aliasing. The GFX50 has a sensor with deliberately shrunken pixel aperture and microlenses. This increases the impression of enhanced crispness by bumping the MTF, at the cost of increased aliasing.
- 80MP pixel shift raw: PS images always look somewhat soft out of the box. I increased the sharpening level over what I would normally use for a single frame in order to better match the crispness of the GFX print. This made the two prints essentially identical except for that GFX telephone wire zig-zag effect.
- 20MP G9 standard: The softest is the standard 20MP G9 frame. It is not lacking detail, just a bit under-sharpened. I upped the clarity and USM a few percent and re-printed. That did the trick, overall the resharpened basic 20MP m4/3 and the GFX50 A2 prints have more or less equal quality.
Overall:
- I don’t think that anyone would be able say that any one of these really had visibly better quality than any of the others when viewed separately. Detail and everything else seems the same.
- When viewed side by side, nothing changes, except that the level of sharpening distinguishes them. More sharpening = crisper prints (up to the level you can bear).
- It’s noticeable that the extreme bottom left corner of the 14-140mm lens is slightly softer than bottom right corner and the opposite seems true of the 35-70mm – the bottom right corner is marginally softer than the bottom left. But the differences are minor and only discernible under the closest of comparisons at this print size.
Conclusions:
- There is insignificant-to-zero image quality difference between prints of this size, even under very close scrutiny.
- Some people who base their expectations on pixel peeping might be surprised that 50MP medium format prints offer no improvement over 20MP m4/3. I’m not. It’s down to the printer, paper size and printing materials.
- Pixel peeping at extreme magnification can reveal differences that are simply not visible in prints below a certain size. Even at the maximum (or near max, there is a bit of white border around the printed area) A2 print size, the printer/ink/paper combination does not have the ability to resolve finer detail than the m4/3 single frame 20MP option offers.
- There really is more detail in the GFX file, but if you want to see this detail difference in print, you need to print at a larger size than a desktop printer can manage. I believe a 40″ wide print would clearly distinguish the formats. What this tells us is that essentially any modern camera can max out the resolving ability of desktop type inkjet printers.
- Sharpening matters a lot. Sharpening can’t add resolution, but it can make what’s there more obvious; the eye likes microcontrast/acutance. You can easily convince yourself that any one of these prints is superior by messing with the sharpening settings, it makes a startling difference. However, you can’t just keep upping sharpening, it’s always a trade off between crispness and a slightly crunchy, over-cooked look. Over sharpen and you risk a hyperreal, rather crude look. These days, given that all our sensors are now high resolving, I aim for a softer, more natural look in prints, there is enough natural unforced resolution it is not necessary to sharpen heavily. But I cut my teeth on early 6MP and below sensors and I constantly have to fight the temptation to give the sharpening slider one extra little nudge.
Thank you very much for this! I started using Olympus Pen-F half format during the nineteen sixties. I remember the projected diapositives were rather similar in quality. By then pro movies were made on half 35mm format and even “Super-16mm”. During a period I used the Japanese Contax 35mm with the superb Zeiss lenses. With digital I’ve used the 4/3rd when it came and also Fuji-X. I have printed up to A2-format with Epson printers and the quality has always been excellent.
When some people discuss APS-C and 4/3rd format compared to FF-format they argue that dynamic range is bad on current smaller formats. The truth is that for example the OM-1 has a dynamic range around 13 EV.
The best photographic paper has a dynamic range of up to 9 EV and the best screens maybe of upto 10 EV but mostly less.
Your conclusion: At “A2 print size, the printer/ink/paper combination does not have the ability to resolve finer detail than the m4/3 single frame 20MP option offers.” is completely true! This is also true for ordinary screens!
Hi Christer
I always work in raw. I use darktable as my raw convertor/editor.
Cheers
David
(I come here from Mike Johnston’s site where I read your advice “Bring a light”)
(I enjoyed both the pictures and the text here.)
Did you work with JPEG or RAW files when doing the comparison?
Thanks for your comment.
I think it is definitely worth repeating these kinds of tests from time to time as a reminder that there is a big disconnect between pixel peeping and printing.
I’m not surprised by this. I have printed quite a number of shots from my Panasonic GX7, GX8 and Olympus EM5iii to fit an IKEA standard photo frame of roughly 50 x 70 cm image size – a bit bigger than A2. And the GX7 (now defunct) was less than 16MP. As much detail as you could reasonably need, even close up. As you suggest (I think), one of the biggest errors is to over-sharpen. With the wisdom of age, I sharpen much much less aggressively than I did in the early days of digital (6mp Pentax *istD etc.). Printspace down in Shoreditch do lovely big prints.